Eyebrows are my thing. I'm plain obsessed with keeping them full, bushy, and snatched at all times, as evidenced by my extensive collection of grooming products. And if you followed my eyebrow lamination journey, then you know the lengths I'll go to for perfect brows—even if it means lying on a bed with plastic wrap on my face. But now that professional services like eyebrow lamination and shaping are temporarily out of the question, it's more important than ever to have the right tools and products on hand to keep our brows looking their best.
That's where celebrity makeup artist Patrick Ta comes in. He recently dropped Major Brow Shaping Wax ($22), which defines, shapes, and mold your brows to feathery perfection in just a few minutes without the use of chemical perming solutions. It's actually a nourishing gel formulated with growth peptides, olive oil, and glycerine to keep your brows healthy. I caught up with Ta virtually to get a step-by-step tutorial on how to use this fab new product. Keep scrolling for the 411.
Step 1: Fill your brows.

You may or may not fill your brows with a pencil, but if you do, you'll want to do that before using this wax. "If you use a pencil, I like to actually color in where I'm going to need to fill in first with my pencil, before using [the brow wax]," Ta says. Sometimes, he explains, pigment from brow pencils won't stick if you use the wax first.
Patrick's pick:

Ta mentioned he likes to pay special attention to the tail of his brows when filling them in. This versatile pencil is perfect for that but can also handle more intense shading needs with its calligraphy tip.
My pick:

I like to fill my brows with hairlike strokes that look super natural. This Anastasia Beverly Hills pencil is my favorite for covering sparse areas with those beautiful flicks.
Step 2: Activate your wax.

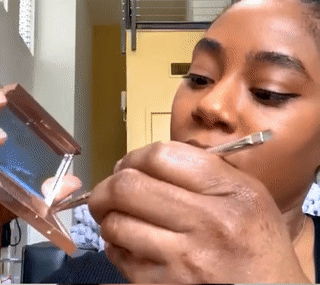
Although it's called a wax, Major Brow is dry in the pan. To create the solution you'll apply to your brows, you need to activate it by simply spraying one to two pumps of your favorite skin mist directly onto the product. Then, swirl one side of your brush vigorously in the wet product until a soft gel forms and coats your brush.
Patrick's pick:

This OG multitasking spray can be used at any stage of your makeup application, whether you're priming your skin or setting your final face.
My pick:

This beloved mist is one I always keep stocked on my vanity. It's got tons of nourishing and hydrating ingredients in it like Okinawa red algae, squalane, silk extract, and green tea. I love how fine the mist is.
Pro tip: Bend the brush.
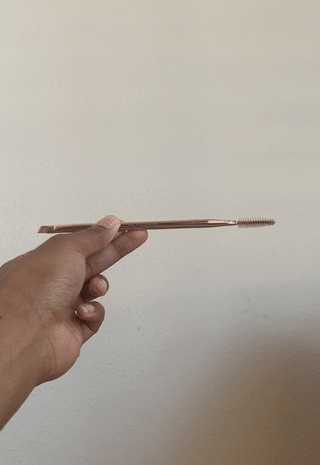
"Sometimes it's easier if you bend the brush so the angle is different," Ta told me. Slightly bending the spoolie end gives you more control.

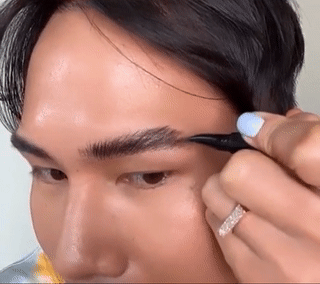
Step 3: Brush the wax into your brows.

Now, with the coated side of your eyebrow brush, brush the wax mixture into your brows, making sure to get each hair. "I like to apply a good amount just because I like my brows to be super laminated," says Ta. The amount of product you'll use will depend on how thick your brows are. The thicker your brows, the more wax you'll likely use.
After your brows are sufficiently coated, allow them to dry for a few minutes. Ta says you'll know the product is dry when the wax no longer feels wet or heavy and your brows feel dry and semi-hard to the touch.
Patrick's pick:

For those with light eyebrow hairs, or who want to keep their look casual, the clear version of the wax is the perfect choice.
My pick:

The tinted wax is super subtle. It doesn't make for overly drawn brows.
Pro tip: Use a fan to help the wax dry faster.

Step 4: Laminate your brows.
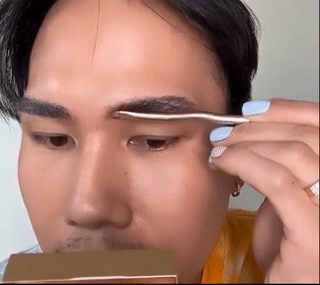
To get that bushy, feathery, laminated look, use the metal part of your eyebrow brush to push your brows until they lie flat against your skin. "You can't really do this with an eyebrow gel, because it kind of flakes and it won't really hold in place," Ta told me.
Thinking of doing this step with your fingers? According to Ta, you could, but you might have a bit of a mess on your hands. "You don't want to smudge the product onto your skin if you're someone who wears foundation," he points out. If you're using the clear version, you could ostensibly use your finger for this step, but doing this might transfer some pigment onto your skin above your brows if you're using the tinted version.
Additionally, Ta points out that not everyone will need to do this step. Those with finer eyebrow hair may find that their brows stand at attention and take on that fluttery look without having to press them down.
Step 5: Brush through your brows once more to create the final shape.
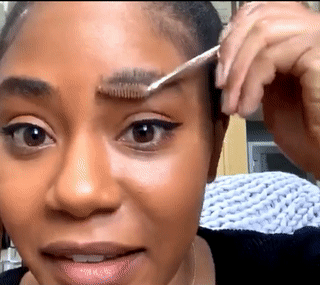
As cool as it is to see your brows looking full and plastered flat, you probably don't want them to look so stark. That's why the last step of the process is to brush through your brows once more to fluff them up a bit. Brush your brows up and out, and then create a smooth shape by dragging your brush along the top of your brows so they look nice and polished. "Even though I like combing out the rest, I really like leaving the ends kind of glued down to the skin," he says.

Optional: If you need to fill any remaining holes, use an eyebrow pen.
Once you're satisfied with the shape of your brows, you'll be able to more clearly see any areas that need to be filled. At this point, Ta says, "The wax is going to give your skin a really nice grip, like a primer, to draw in and color in [for a brow pen] after." As mentioned before, Ta recommends using your brow pencil before using the wax.
Patrick's pick:

My pick:

Final thoughts:

As someone who's had her eyebrows professionally laminated (and loved it!), I'm fully obsessed with this brow wax. It's quick, easy to use, and delivers the same exact feathery results as lamination. I also love that the finish is soft and workable and not at all heavy or hard. You could easily re-laminate your brows if they need touching up at any point in the day without worrying about generating flakes. I also like how temporary it is—just wash it off like you would any other makeup, and you're back to your normal brows.
While it's an awesome service that I highly recommend, there are certain risks associated with professional eyebrow lamination that would lead some to steer clear. (I trust my brow artist, Aja, implicitly and would advise that anyone seeking professional lamination find a skilled artist they trust too.) This wax is a solid substitute, and at just $22, it's a much more cost-effective solution as well.
Watch the full tutorial here:
Shop more Patrick Ta Beauty picks:


-
 J.Lo Wore the Chic Heel Color Everyone Will Wear Instead of Black This Summer
It makes every outfit look pricey.
-
 From Prada to Balmain, Here's What the Next WNBA Stars Wore on Draft Night
I can't wait for the tunnel 'fits.
-
 Suki Waterhouse Wore the New Adidas It Sneakers to Coachella With a Fur Coat
Get a pair before they're sold out everywhere.


